I’ve been through basement renovations a couple times now, and let me tell you—it’s not as simple as those home improvement shows make it look. Trust me on this one.
Before I dive into all the details, I want to share something I wish I had known before starting my first basement project. Nobody told me just how many hidden issues would pop up once we started tearing into walls! Our “simple” renovation turned into a three-month adventure that cost about 30% more than we planned.
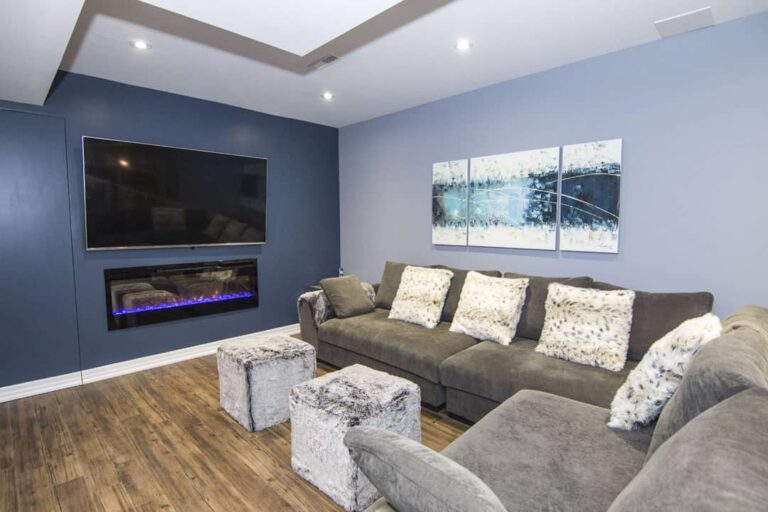
But here’s the good news. If you plan things right, your basement can become the most amazing space in your house. Our finished basement is now where everyone gravitates during parties, where the kids want to hang out, and honestly, where I escape to watch movies when I need some quiet time.
Let’s look at what you really need to know before you start ripping out walls and dreaming about that perfect basement space.
How to Plan Basement Renovation?
Planning a basement renovation can feel overwhelming at first. Where do you even start?
When we began our basement project, I made the mistake of jumping straight to the fun stuff—picking paint colors and planning where the TV would go. Bad move! I had to backtrack and deal with water issues that cost way more to fix later than if I’d handled them first.
So I’m going to walk you through the planning process in the order that actually works, based on what I learned the hard way.
Start with Professional Waterproofing to Protect Your Investment
This is the absolute most important step. Skip it, and you might end up redoing your entire renovation.
We thought our basement was “pretty dry” because we only saw minor dampness during heavy rainstorms. We figured we could handle it with a dehumidifier. Wrong.
Six months after finishing our beautiful new basement, we had water seeping through the bottom of our walls during a big spring storm. It ruined our brand new carpet and some of the drywall. We had to tear it all out and start over.
Hiring waterproofing basement contractors seemed expensive at first—about $3,500 for our 1,000 square foot basement. But that’s nothing compared to the $12,000 we spent fixing water damage and redoing finishes. Not to mention the heartbreak of seeing all our hard work ruined.
Here’s what a good waterproofing job might include:
- Fixing cracks in your foundation
- Installing a proper drainage system
- Adding or upgrading your sump pump
- Applying waterproof coatings to walls
- Checking window wells and exterior grading
Get at least three quotes from different companies. Ask how long their warranty lasts and exactly what it covers. The cheapest quote isn’t always the best one!
Understand Local Building Codes and Permit Requirements
I made a huge mistake with our first basement project. I didn’t pull permits because I thought, “It’s just a basement, who’s going to know?”
Well, our insurance company found out when we had that water damage I mentioned. They almost didn’t cover the repairs because the work wasn’t permitted. That was a scary few weeks waiting for their decision!
Building codes exist for good reasons. They make sure your renovation is safe for your family. Important basement requirements typically include:
- Minimum ceiling height (usually 7 feet)
- Proper emergency exits from bedrooms
- Safe electrical work
- Proper ventilation
- Fire safety measures
The permit process isn’t as scary as it sounds. Here’s how it went for us:
- We visited our local building department website
- Downloaded the application forms
- Drew some simple plans showing what we wanted to do
- Paid about $250 for the permits
- Had inspections at different stages of the project
The inspections actually helped us catch a few things our contractor missed. Worth every penny of that permit fee!
Plan for Proper Insulation and Ventilation
Our first basement was always cold in winter and damp in summer. Why? Because we skimped on insulation and didn’t think about air circulation.
Basements need special insulation approaches. Here’s what worked for us on our second renovation:
- We used 2-inch rigid foam insulation directly against our concrete walls
- Sealed all the seams with special tape
- Added a 2×4 stud wall in front of the foam
- Filled the stud cavities with regular batt insulation
- Used plastic sheeting as a vapor barrier
The difference was amazing! Our heating bills dropped by about $45 per month in winter, and the space stays comfortable year-round.
For ventilation, we made sure our HVAC system could handle the extra square footage. Our contractor extended existing ductwork into the basement, adding three supply vents and two return vents. This cost about $1,200 but prevents moisture buildup and keeps air flowing.
We also installed a standalone dehumidifier that drains directly into our sump pit. It runs mostly in summer, keeping humidity around 50% and preventing that musty basement smell.
Design the Layout to Maximize Functionality and Flow
Working around support columns, low-hanging pipes, and other obstacles makes basement layouts tricky.
For our layout planning, we tried something that worked really well. We used blue painter’s tape to mark the walls directly on the concrete floor. Then we brought down some furniture and moved it around within those taped lines. This gave us a much better feel for the space than just drawing it on paper.
We discovered that what looked good on paper felt way too cramped in real life. Our original plan had five separate areas crammed into the basement. After walking through the taped layout, we simplified to three zones:
- A TV/hangout area with a sectional sofa
- A small office nook behind the sofa
- A guest bedroom area separated by a partial wall
Some layout tips we learned:
- Leave a clear path to your utility areas and circuit breaker
- Group “wet” elements like the bathroom and wet bar near existing plumbing
- Consider sound travel—we regret putting the TV area right under our bedroom!
- Plan furniture placement before finalizing electrical outlets
- Think about natural light—put activities that need good light near windows
Take photos of your taped layout from different angles. You’ll spot problems you didn’t notice while standing in the space.
Choose Durable and Moisture-Resistant Finishes
Regular materials often fail in basements due to the higher moisture levels.
Our first basement had beautiful oak hardwood floors that we loved… for about four months. Then they started cupping from moisture. We had to tear them out and replace everything.
For our second renovation, we chose materials specifically designed for below-grade spaces:
- Luxury vinyl plank flooring that looks like wood but is 100% waterproof
- Mold-resistant drywall (the green or purple kind)
- PVC baseboards and trim that won’t rot or warp
- Semi-gloss paint with mildew resistance
- Metal shelving instead of wood for storage areas
These moisture-resistant materials cost about 15% more than standard materials, but they’ve held up perfectly for years now.
One specific product recommendation: we used DRIcore subfloor panels under our vinyl flooring. These create a small air gap between the concrete and your finished floor. They cost about $1.75 per square foot but help prevent moisture problems and make the floor warmer underfoot.
Set a Realistic Budget and Timeline
I’m just going to be straight with you—basement renovations almost always go over budget and take longer than planned.
For our 1,000 square foot basement, here’s how the costs broke down:
- Waterproofing: $3,500
- Permits and inspections: $250
- Framing materials: $1,200
- Electrical work: $2,800
- Plumbing: $1,800
- Insulation: $950
- Drywall and finishing: $3,200
- Flooring: $4,500
- Trim and doors: $1,100
- Paint: $450
- Lighting fixtures: $600
- Bathroom fixtures: $1,200
- Miscellaneous: $1,400
Total: About $23,000, which was $4,500 more than our initial budget. And that doesn’t include furniture!
The timeline stretched too. We planned for 6 weeks, but it took almost 10 weeks from start to finish. Delays happened because:
- The electrician found old wiring that needed replacing
- We had to wait two extra weeks for the flooring to arrive
- Our drywall guy got sick for a week
- Inspections sometimes took days to schedule
My advice? Whatever budget you set, add 20%. Whatever timeline you expect, add 30%. You’ll be much happier if you finish early and under budget than the other way around!
Conclusion
Our basement went from a cold storage space where nobody wanted to spend time to the most popular room in our house. The renovation wasn’t easy, and we definitely made some mistakes along the way.
But the result was totally worth it. We’ve hosted movie nights, birthday parties, and even had relatives stay comfortably in our guest area. The kids love having friends over, and I finally have a quiet office space for working from home.
If I could go back and give myself advice before starting, it would be:
- Fix water issues FIRST, no matter what
- Get those permits—they protect you in more ways than one
- Don’t skimp on insulation and ventilation
- Simplify your layout—less is more in basements
- Choose materials specifically made for basement conditions
- Budget for surprises, because you’ll definitely find some
One last tip—take “before” pictures! I wish we had more photos of our old dingy basement. The transformation is so dramatic that sometimes I can hardly remember what it looked like before.
Your basement has amazing potential. With proper planning and realistic expectations, you can create a space your whole family will love for years to come. And when those heavy rainstorms hit, you’ll sleep soundly knowing your investment is protected.


