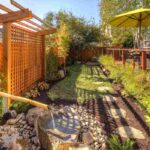
You spent good money on that outdoor space. The pergola, the furniture, maybe even a kitchen setup.
Then winter shows up and suddenly you’re looking at it through a window instead of using it.
That’s where most people get it wrong. They think outdoor spaces are seasonal.
Three months of use, nine months of looking pretty but sitting empty.
However, the addition of a high-quality louvered pergola can fundamentally change how you utilize your backyard during the colder months.
We’re talking about actual year-round use, not just the idea of it.
But here’s where it gets tricky.
There’s a lot more to extending your outdoor season than just throwing a heater out there and hoping for the best.
You need the right setup, the right gear, and honestly, the right mindset about what works and what’s just marketing.
Let’s get into it.
9 Ways To Extend Your Outdoor Season Year-Round And How Pergola Heaters Explained
Install Pergola Heaters for Instant Warmth
This is the big one. The thing that actually makes cold weather outdoor living possible instead of just tolerable for 10 minutes before you run back inside.
Heat transfers three ways: conduction, convection, radiation.
Conduction is hot surface touching cold surface.
Not what we’re after unless you want to hug your heater.
Convection is space heater style, blowing warm air around. Radiation is infrared, and that’s your winner for outdoor spaces.
Why? Wind.
Convection heaters push warm air that just… leaves.
Wind carries it away. You’re heating the neighborhood. Infrared radiates heat directly onto objects and people, so wind doesn’t steal it as fast.
That’s not just theory. That’s the difference between a heater that works and one that doesn’t once you’re outside.
For pergolas specifically, you’re looking at mounting options.
Ceiling mount usually works best because heat rises anyway, so you’re fighting physics a bit, but the infrared ones compensate for that.
Wall mount can work if your pergola has solid walls or you’ve added some.
The freestanding tower ones? They work.
They’re just not as clean looking, and you have to plan around them instead of building them into your space.
Choose the Right Type of Pergola Heater
This is where people get overwhelmed. Too many options, too many price points, and everyone’s got an opinion.
Let’s break it down by fuel source because that’s really what determines everything else.
Electric heaters run on 120 volt (standard outlet) or 240 volt (dryer, hot tub, EV charger level). The 240 volt ones put off way more heat, but here’s the catch.
Most of these max out the amperage on whatever circuit they’re on.
So if you plug a 120 volt heater into your kitchen circuit and start making coffee, you might trip the breaker.
Same with 240. If your dryer’s running, your heater’s not.
You need a dedicated line for most of these, which means an electrician and a cost you didn’t budget for.
The upside? Clean, relatively safe, no storage issues.
The downside? Your electric bill. These are expensive to run, and if you’re in a cold climate using them regularly, you’ll notice.
Natural gas heaters cost less to operate long-term, but the install is pricey and you need a pro.
I wouldn’t touch a gas line myself and I’ve installed plenty of heaters. Too much risk.
They also need ventilation.
Code varies by region, but generally you need air exchange so gas doesn’t build up.
Most pergolas are open enough for this, but if you’ve enclosed yours heavily, check with your local code office first.
They start up faster than electric, typically put off more BTUs, and once they’re in, they’re in. No refilling, no tank storage.
Propane heaters are your most portable option and usually your best cost-to-heat ratio.
You’re not paying for installation or high electric bills. You’re paying for propane refills and dealing with tank storage.
The torpedo style ones are my favorite because they look like a jet engine going off and they heat fast. But they smell.
They put off fumes. You absolutely cannot run these in a closed space, and I know people who warm up their garage with these before working in there. Don’t. It’s bad for you.
For propane in general, you need ventilation just like natural gas.
You need safe storage away from your house. Check your local fire codes on that.
Actually, one more thing. Firewood-based options.
Solo stoves are popular right now.
Metal case, airflow design, less smoke than a traditional fire pit.
I have one under my pergola. I drop the shades to cut wind, throw wood in, let it go straight up through the louvers.
Traditional fire pits throw more smoke, more cinders flying out.
Chimineas give you basically no smoke because of the chimney setup, but they’re not everyone’s style.
Pros of fire? Ambiance. Warmth. You made fire, you feel like a person who can survive in the woods.
Cons? You have to know how to light it without using gasoline.
You have to tend it. You need dry wood storage. It’s smoky even with a solo stove, just less so.
Add Weatherproof Outdoor Curtains and Screens
Here’s what most people miss. A heater alone in a completely open pergola is fighting a losing battle.
You need to trap some of that heat. Not all of it, you still want ventilation especially if you’re using gas or propane. But wind is your enemy, and curtains or screens cut wind.
Weatherproof curtains on tracks let you close off sides when it’s cold, open them when it’s not.
You don’t have to commit to a fully enclosed space year-round, you just adapt based on weather.
Screens work too, but they’re usually more permanent.
Fixed panels, maybe some that slide. They block wind but let you see out, which is nice if you’ve got a view you paid for.
I’ve seen people skip this step, crank their heater to max, and wonder why they’re still cold.
You’re heating the whole outdoors at that point.
Upgrade to Cozy Outdoor Furniture
Your summer furniture probably isn’t cutting it in cold weather.
Metal chairs with thin cushions? You’re going to be cold no matter how good your heater is.
Think about materials that hold heat or at least don’t suck it out of you.
Wicker with thick cushions. Wood. Deep seating where you can actually curl up.
Outdoor blankets. Throw pillows. This isn’t just decoration, it’s insulation between you and cold surfaces.
Also, furniture arrangement matters. Pull seating closer to your heat source.
Create a pocket of warmth instead of spreading everything out like you would in summer.
Install a Fire Feature for Warmth and Ambiance
We touched on this in the heater section, but it’s worth its own mention because fire features do double duty. Heat and atmosphere.
A built-in fireplace is the luxury option.
Stone or pavers, integrated into your pergola design, chimney venting properly. You’re looking at thousands, but it becomes a focal point.
Fire pits are more flexible. You can go cheap with a metal one from a big box store for $30, or you can invest in something custom.
Sky’s the limit on pricing really. It’s about what look you’re going for.
Solo stoves fall somewhere in the middle. Several hundred bucks, good performance, modern look.
The thing about fire features is they require participation.
You can’t just flip a switch. You’re committing to tending a fire, and some nights you don’t want that. That’s when you need the other heating options as backup.
Improve Lighting for Shorter Days and Nights
Winter means it gets dark at like 4:30 PM depending where you are.
Your outdoor space becomes unusable if you can’t see.
String lights are the easy answer, but they’re not always enough. You need task lighting too. Lights over cooking areas, dining areas, paths.
Recessed lighting in your pergola beams. Wall sconces if you’ve got walls.
Even portable lanterns work if you’re going for a certain vibe.
Warm color temperature makes a difference. Cool white light feels clinical, like a hospital.
Warm white or soft white makes it feel like a space you want to be in when it’s cold.
Use Outdoor Kitchens and Dining Areas Year-Round
If you’ve got an outdoor kitchen, winter shouldn’t stop you from using it.
Actually, grilling in cold weather can be better. The grill holds heat well, and you’re not standing over it in 90 degree summer heat.
The trick is making sure your kitchen area is protected. A heater nearby helps.
A roof over it so snow or rain isn’t landing on your cooking surface.
Weatherproof covers for when you’re not using it. Insulated covers for grills help them heat up faster in cold weather.
Some people winterize their outdoor kitchen completely.
Drain water lines, cover everything, pretend it doesn’t exist until spring. But if you’ve got heating and coverage, there’s no reason you can’t use it.
Same with dining. A heated, partially enclosed dining area under a pergola works year-round if you set it up right.
Add Shade and Cooling Solutions for Summer Comfort
Wait, aren’t we talking about cold weather?
Yeah, but extending your outdoor season year-round means solving for both extremes. Winter is about heat. Summer is about shade and cooling.
Adjustable louvered roofs let you control sun exposure.
Close them for shade, open them when you want sun or stargazing.
Retractable shade sails. Fabric panels that you can remove when they’re not needed.
Misters work in dry climates. Fans help everywhere.
The point is year-round doesn’t mean winter-only. You’re building a space that adapts. That’s the real goal.
Winterize and Maintain Your Outdoor Space
Even if you’re using your space year-round, you need to maintain it properly.
Heaters need annual checks. Electric ones need to be inspected for damage. Gas ones need professional service to make sure lines are good and there’s no leaks.
Propane heaters need cleaning. Burners get clogged.
Furniture needs to be checked for weather damage.
Wood needs to be resealed. Metal needs to be checked for rust. Cushions need to dry out if they get wet.
Fire pits need ash cleaned out. Chimneys need to be inspected.
Water features need to be drained if you’re in a freeze zone. Pipes need to be blown out. Covers need to go on.
Not all of this is fun, but it’s what keeps your space functional instead of becoming a maintenance nightmare by spring.
Conclusion
Extending your outdoor season isn’t about one thing. It’s about layering systems.
Heat source. Wind protection. Proper furniture. Lighting. Maintenance.
The heater is the big piece. Infrared if you want wind resistance.
Propane if you want portability and low operational cost.
Electric if you want clean and safe. Natural gas if you want low running costs and don’t mind the install price.
But the heater alone won’t do it.
You need to trap heat with screens or curtains.
You need furniture that doesn’t suck warmth out of you.
You need light so you actually want to be out there when it’s dark at 4:30.
Most importantly, you need to actually use it. That’s the part people miss.
They set everything up and then still default to staying inside because they’re not in the habit.
Force yourself out there a few times. Bring coffee in the morning.
Dinner on a cold evening. Once you prove to yourself it works, it becomes automatic.
Your outdoor space doesn’t have to sit empty for nine months.
That’s a choice, not a requirement.